Create list
Add to shopping list
- My favorites
- {{ list.name }}


Equinox Replacement Battery
Genuine Minelab replacement battery for the Equinox series metal detectors.
If your Equinox battery ha become tired, you can now buy a replacement and install it yourself.
-
Description
Minelab Equinox Replacement Battery
Replace the EQUINOX Series internal Li-Ion battery.
Due to the waterproof design of EQUINOX Series detectors it is strongly recommended you read all instructions prior to commencing the battery replacement.
A video demonstrating the replacement process can be found on the Minelab YouTube Channel, search for "EQUIONX Battery Replacement Video"
All Minelab Authorised Service Centres can perform the internal battery replacement if you prefer to have the work performed without possibility of voiding your Control Panel warranty.
The EQUINOX internal Li ion Battery has a warranty period of 6 months from original date of detector purchase.
Overview
Detector: EQUINOX Series
Difficulty: Easy
Time Required: 10 mins
Hazards: Water Ingress
Tools
Hex Driver 3mm (H3)
Hex Driver 2mm (H2)
Needle Nose Pliers
Parts 3011-0405Step 1
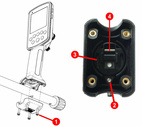
Access the battery compartmentUsing Hex Driver 3mm (H3), remove 4 x M4x16 screws [1] to separate the Control Pod from the upper stem.
Using Hex Driver 2mm (H2), remove 1 x M3x8 screw [2]
With your thumb resting on the bung assembly [3], gently pull the bung out of the Control Pod handle using Needle Nose Pliers gripping the extraction pin [4]. Use your thumb to control a slow & steady removal rate.Step 2
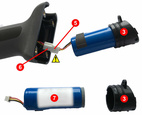
Remove the batterySlowly ease the bung [3] and battery out of the Control Pod handle until the wiring loom connector [5] is presented.
Do not extract the wiring loom connector beyond the entrance of the battery compartment as doing so may cause irreparable damage to the Control Pod.
Hold the wiring loom connector [5] firmly with your finger and thumb and release the battery by pushing the latch [6] and disconnect the battery from the internal wiring loom.
Separate the bung assembly [3] from the battery [7] by firmly pulling the two apart.Step 3
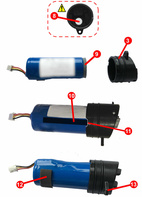
Prepare new battery for installationInspect the bung assembly [3] and confirm:
Two O-rings are present and free from dirt & grit.
Gore vent [8] is present and undamaged. Do not touch or tamper with the bung assembly gore vent [8].
Affix the foam disc [9] to the bottom of the replacement battery and push the battery into the bung assembly [3] ensuring that the guide marking [10] is aligned with the notch [11] of the bung.
Affix the 20mm foam tape [12] to the battery ensuring 5mm from the top of the battery and centre-aligned with the bung tab [13].Step 4
Replacement battery installation
Connect the battery cable to the Control Pod wiring loom ensuring that the white connector is not forcibly extended beyond the entrance of the battery compartment while doing so.
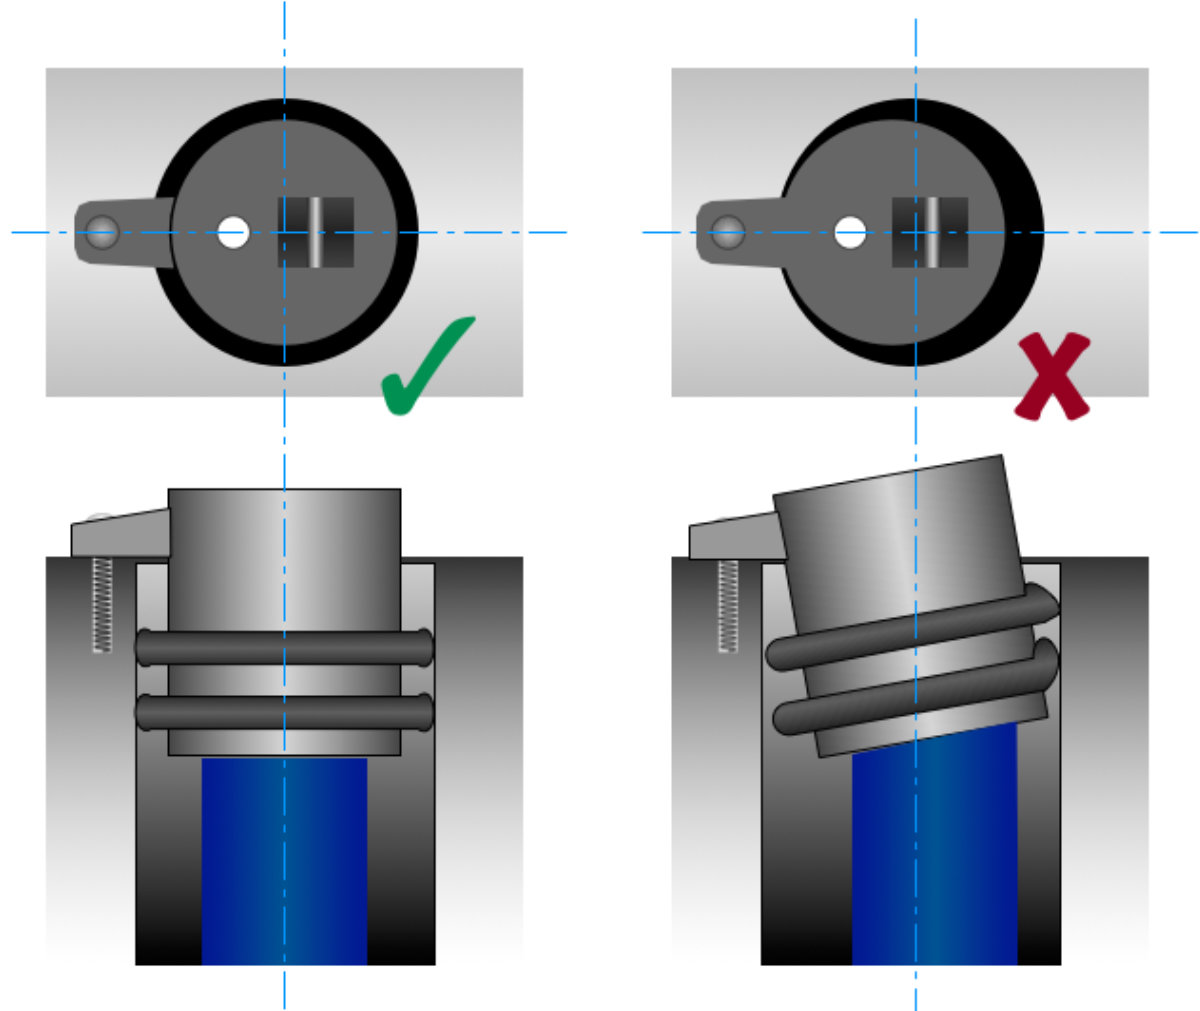
Ease the bung and battery into the Control Pod handle with the tab [13] of the bung aligned to the slot [14] of the Control Pod handle.
The battery and bung assembly should enter the Control Pod easily without significant resistance.
The final 5mm of the battery assembly insertion may require additional force.
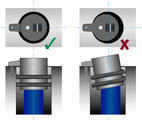
It is critical that the bung is positioned symmetrical into the handle. If the bung is asymmetrical, this may lead to water ingress!
Secure bung with 1 x M3x8 screw [2] using Hex Driver 2mm (H2). Tighten by hand taking care not to strip the threads.
The torque should not exceed 0.5 Nm
Ensure the bung does not move when tightening the screw and the bung is still positioned symmetrical into the handle when tight.Step 5
ResassemblyReassemble the Control Pod to the upper stem by installing 4 x M4x16 screws [1] using Hex Driver 3mm (H3)
The torque should not exceed 1.0 Nm